Mastering Unit Testing in Julia Programming Language
Written on
Introduction to Unit Testing in Julia
Welcome back to our series focused on the Julia programming language, especially its application in comprehensive machine learning projects. In this entry, we will explore the concept of unit testing. As your data infrastructure matures, unit testing becomes vital to prevent broken code and errors, particularly when integrating Continuous Integration/Continuous Deployment (CI/CD) into your workflow.
The built-in Test package in Julia facilitates a test-driven development (TDD) approach, promoting robustness in software and machine learning projects through systematic testing. We will examine three straightforward examples demonstrating how to utilize Julia for effective unit testing and TDD.
To keep the examples simple, we will skip the refactoring phase of TDD.
For those new to the series, feel free to check out previous posts related to the Julia programming language!
Running Examples
Example 1: Adding an Element to an Array
To illustrate, we will create a function that appends an element to an existing array and confirms whether the count of elements is as expected.
Red Step
First, we will define our test case within a function called test_example_fn. The @test keyword in Julia serves a similar purpose to Python's assert function, determining whether the condition next to it is satisfied. You can categorize your tests using the @testset macro.
using Test
function example_fn(element_1, list)
return []
end
function test_example_fn()
# Example list
example_list = []
example_list_result = example_fn(42, example_list)
@test length(example_list_result) == 1
end
# Run the tests
@testset "Example Function Tests" begin
test_example_fn()
end
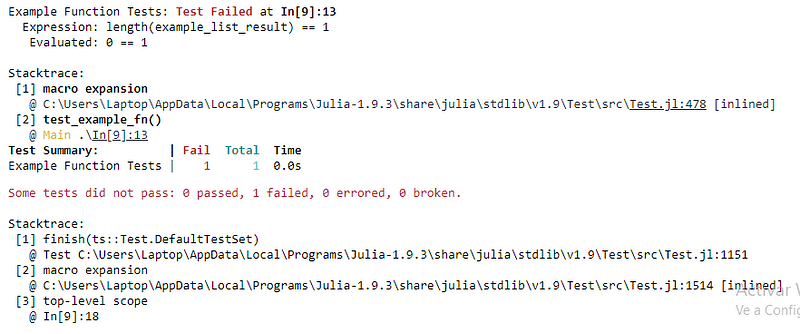
Executing this code will yield results similar to the failure depicted in Figure 1. The test fails because example_list_result contains no elements, resulting in a length of 0.

Green Step
Now, let’s address the green step of TDD. We need to analyze example_fn, which currently returns an empty array regardless of the input. We will modify the function to return the updated list after pushing the new element.
using Test
function example_fn(element_1, list)
return push!(list, element_1)
end
function test_example_fn()
# Example list
example_list = []
example_list_result = example_fn(42, example_list)
@test length(example_list_result) == 1
end
# Run the tests
@testset "Example Function Tests" begin
test_example_fn()
end
Upon running the modified test, you should see success results akin to Figure 2.

Example 2: Ideal Gas Pressure Calculator
In this example, we will create a simple calculator to determine the pressure of an ideal gas based on the amount of substance, temperature, and volume.
Red Step
Assuming the following parameters: 303 K, 100 mol, and 2 m³, we expect a pressure of about 125,964 Pa.
using Test
function example_fn(n, T, V)
R = 8.3145 # Gas constant (J/mol.K)
P = R * n * T
return P
end
function test_example_fn()
T = 303 # Temperature (K)
n = 100 # Amount of substance (mol)
V = 2 # Volume (m^3)
P = example_fn(n, T, V)
@test P == 125964
end
# Run the tests
@testset "Example Function Tests" begin
test_example_fn()
end
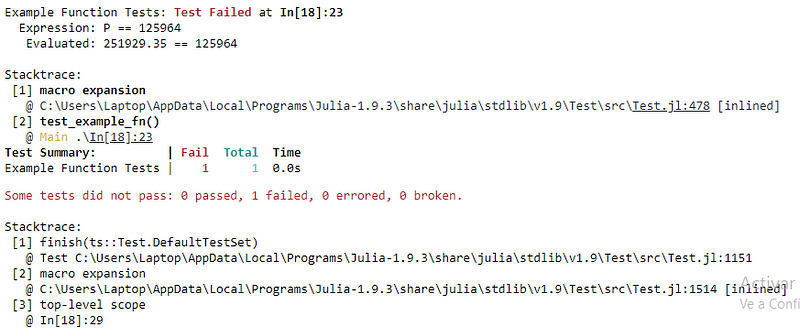
Running this test will show that the pressure calculated is incorrect, as indicated in Figure 4.

After debugging, you realize the equation needs adjustment:
function example_fn(n, T, V)
R = 8.3145 # Gas constant (J/mol.K)
P = R * n * T / V
return P
end
After fixing the equation and rerunning the test, it should pass, as depicted in Figure 6.

Example 3: Multiple Test Cases
For this final example, we will extend our gas calculator to handle multiple test cases as provided by our project manager.
Red Step
We’ll define an array test_cases containing various sets of parameters to validate our function.
using Test
function example_fn(n, T, V)
R = 8.3145 # Gas constant (J/mol.K)
P = R * n * T / V
return P
end
function test_example_fn()
test_cases = [[303, 100, 2, 125964],
[345, 50, 1, 143424.5],
[121.866, 200, 2, 101325]]
for (T, n, V, expected_P) in test_cases
P = example_fn(n, T, V)
@test P ? expected_P atol=2 broken=false
end
end
# Run the tests
@testset "Example Function Tests" begin
test_example_fn()
end
Initially, all tests fail, as shown in Figure 7.

Green Step
After debugging, you discover that a colleague mistakenly altered the pressure calculation. Once corrected, you rerun the tests, achieving successful results as seen in Figure 8.

Additional Insights
The test outputs utilize terms such as "failed," "errored," and "broken." Here’s a brief explanation of these terms:
- Error: Indicates an unexpected exception in the code being tested.
- Fail: Suggests that a specific assertion did not hold, pointing to a potential bug.
- Broken: Usually refers to issues with the testing infrastructure rather than the code itself.
Conclusion
This guide has illustrated how to employ a test-driven development framework within your coding projects using Julia, whether focused on machine learning or software applications. By leveraging various data types and organizing tests by modules, Julia empowers you to write reliable and clean code from the ground up. In our next article, we will elevate our Julia skills by exploring integration testing.
If you found this article helpful, consider following me on Medium for more insightful content, and feel free to share this material with your peers!
This video discusses best practices in Julia, emphasizing the importance of efficient research code.
In this video, Katharine Hyatt presents how to write Julia code for simulating large quantum systems.